Floor register installation involves placing a new vent cover in a previously unvented area, ensuring proper airflow distribution and securing it to the existing duct opening. Floor register replacement requires removing the old, possibly damaged or outdated register and fitting a new one of compatible size and style to maintain optimal ventilation and aesthetic appeal. Both processes demand precise measurement and alignment to ensure efficient air circulation and avoid gaps that could reduce HVAC performance.
Table of Comparison
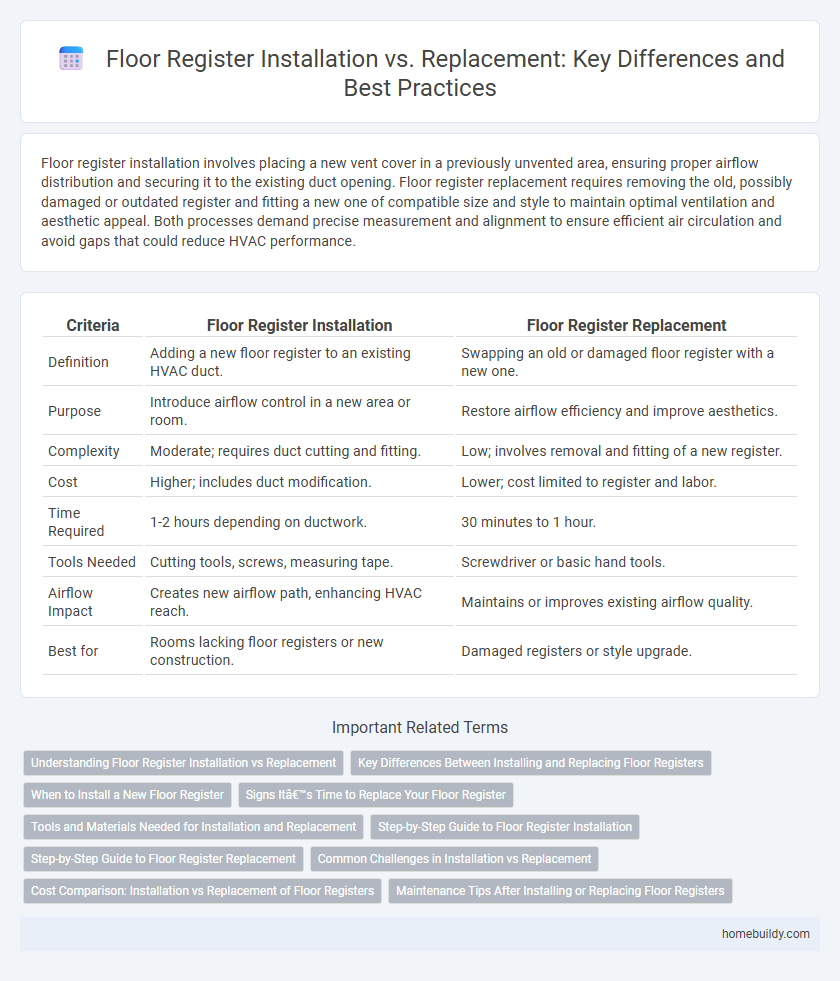
| Criteria | Floor Register Installation | Floor Register Replacement |
|---|---|---|
| Definition | Adding a new floor register to an existing HVAC duct. | Swapping an old or damaged floor register with a new one. |
| Purpose | Introduce airflow control in a new area or room. | Restore airflow efficiency and improve aesthetics. |
| Complexity | Moderate; requires duct cutting and fitting. | Low; involves removal and fitting of a new register. |
| Cost | Higher; includes duct modification. | Lower; cost limited to register and labor. |
| Time Required | 1-2 hours depending on ductwork. | 30 minutes to 1 hour. |
| Tools Needed | Cutting tools, screws, measuring tape. | Screwdriver or basic hand tools. |
| Airflow Impact | Creates new airflow path, enhancing HVAC reach. | Maintains or improves existing airflow quality. |
| Best for | Rooms lacking floor registers or new construction. | Damaged registers or style upgrade. |
Understanding Floor Register Installation vs Replacement
Floor register installation involves fitting a new vent cover into an existing duct opening, ensuring proper airflow and alignment with the floor surface, while floor register replacement entails removing an old or damaged register and installing a new one, often to improve aesthetics or functionality. Installation requires measuring the duct opening, choosing the correct size and style, and securing the register to prevent air leaks. Replacement focuses on upgrading worn-out registers with more efficient materials or designs, maintaining HVAC efficiency and enhancing room appearance.
Key Differences Between Installing and Replacing Floor Registers
Installing a floor register involves fitting a new unit into a previously uncovered floor vent, requiring precise measurements and compatibility checks with the duct size and floor type. Replacing a floor register focuses on removing an existing, often worn or damaged register and installing a new one in the same opening, usually demanding minimal floor alterations but ensuring proper sealing and alignment. Both processes prioritize airflow efficiency and aesthetic integration, but installation demands greater initial planning, whereas replacement emphasizes restoring function and appearance.
When to Install a New Floor Register
Install a new floor register when upgrading your HVAC system or renovating your flooring to ensure optimal airflow and aesthetic integration. Replacement is ideal for damaged, rusted, or warped registers impairing ventilation performance. Choose installation over replacement when the existing register size or style no longer fits your functional or design requirements.
Signs It’s Time to Replace Your Floor Register
Signs it's time to replace your floor register include visible rust, warping, and difficulty adjusting airflow, which indicate wear and diminished performance. Cracked or broken grilles can cause air leaks, reducing HVAC efficiency and increasing energy costs. If your floor register no longer fits securely or squeaks during airflow adjustments, replacement ensures optimal air distribution and home comfort.
Tools and Materials Needed for Installation and Replacement
Installing a floor register requires tools such as a measuring tape, screwdriver, saw for resizing the opening, and materials like the new register, screws, and possibly wood filler for adjustments. Replacement often involves simpler tools, typically just a screwdriver and the new register, as removal of the old unit is usually straightforward without cutting or filler. Selecting appropriate materials, such as rust-resistant registers for high-moisture areas, ensures durability for both installation and replacement processes.
Step-by-Step Guide to Floor Register Installation
Floor register installation involves carefully measuring the existing duct opening to ensure a proper fit, removing the old register if present, and securely fastening the new register using screws or clips to maintain airflow efficiency. Key steps include cleaning the duct opening, positioning the register so that the adjustable dampers can be easily accessed, and sealing around the edges with HVAC foil tape to prevent air leaks. This process differs from floor register replacement primarily in the initial preparation, where installation requires precise alignment and adjustment for optimal ventilation performance.
Step-by-Step Guide to Floor Register Replacement
Removing the old floor register begins by gently lifting it from the vent opening using a flathead screwdriver or your fingers to avoid damaging the surrounding floor. Measure the dimensions of the existing vent to ensure the new floor register fits perfectly, then clean the vent area of dust and debris for optimal airflow. Position the new register into the opening, pressing firmly to secure it in place without gaps, and test the fit by adjusting the airflow to ensure efficient ventilation.
Common Challenges in Installation vs Replacement
Floor register installation often involves challenges such as ensuring proper fit within existing duct openings and leveling the register for optimal airflow. In contrast, replacement tasks frequently encounter issues related to removing old fasteners, matching new registers to varying legacy sizes, and addressing wear or damage around the installation site. Both processes require precise measurements and attention to material durability to maintain efficient HVAC performance.
Cost Comparison: Installation vs Replacement of Floor Registers
Installing a new floor register typically involves higher upfront costs due to materials, labor, and potential floor modifications. Replacement of an existing floor register generally incurs lower expenses, as it requires minimal alterations and less labor time. Cost efficiency favors replacement for routine updates, while installation suits new construction or major renovations.
Maintenance Tips After Installing or Replacing Floor Registers
Proper maintenance after installing or replacing floor registers includes regular cleaning to prevent dust buildup and ensure optimal airflow. Checking for secure fitting and sealing helps avoid air leaks and improves HVAC efficiency. Periodic inspection for damage or wear extends the lifespan of floor registers and maintains indoor air quality.
Floor register installation vs floor register replacement Infographic