Z-flashing installation involves using metal strips bent in a Z shape to direct water away from siding joints, providing a sleek and effective barrier against moisture infiltration. Step flashing installation requires individual L-shaped pieces layered with each course of shingles, creating a thorough seal around roof edges and chimneys but demanding more precise placement and labor. Compared to step flashing, Z-flashing offers a faster installation process and a cleaner look, while step flashing provides more detailed protection in complex roof-to-wall intersections.
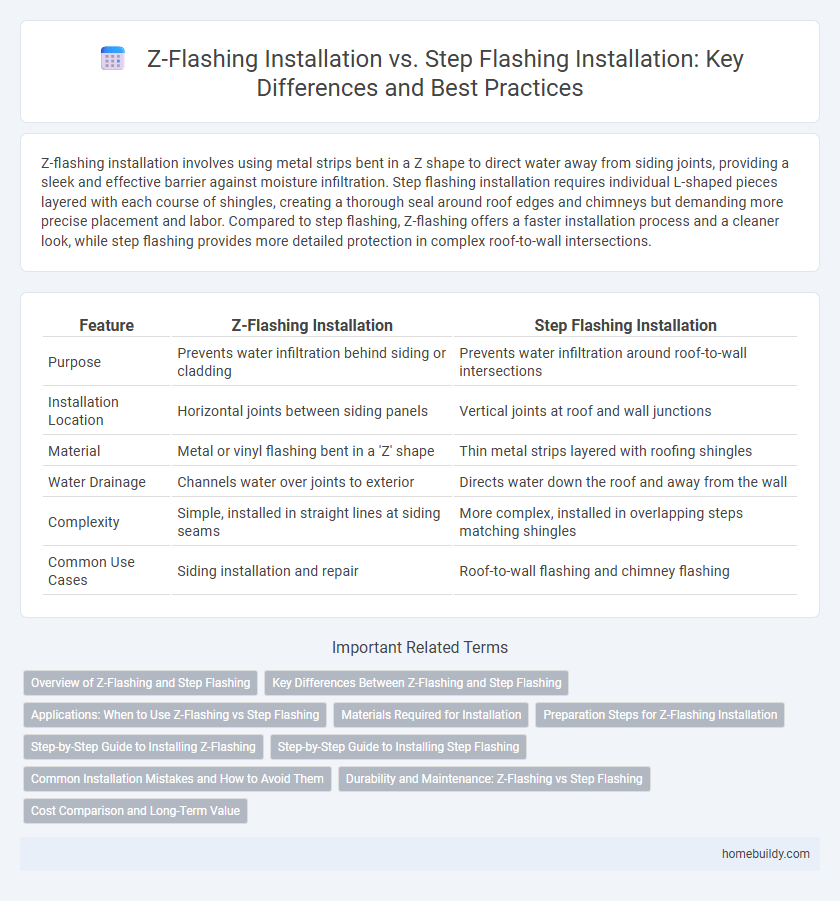
Table of Comparison
| Feature | Z-Flashing Installation | Step Flashing Installation |
|---|---|---|
| Purpose | Prevents water infiltration behind siding or cladding | Prevents water infiltration around roof-to-wall intersections |
| Installation Location | Horizontal joints between siding panels | Vertical joints at roof and wall junctions |
| Material | Metal or vinyl flashing bent in a 'Z' shape | Thin metal strips layered with roofing shingles |
| Water Drainage | Channels water over joints to exterior | Directs water down the roof and away from the wall |
| Complexity | Simple, installed in straight lines at siding seams | More complex, installed in overlapping steps matching shingles |
| Common Use Cases | Siding installation and repair | Roof-to-wall flashing and chimney flashing |
Overview of Z-Flashing and Step Flashing
Z-flashing is a continuous, Z-shaped metal flashing used primarily to direct water away from horizontal joints where siding meets windows or doors, providing an effective barrier against water infiltration. Step flashing consists of individual L-shaped pieces installed in steps along vertical joints, commonly where roofing meets walls, allowing water to be shed incrementally at each overlap. Both methods are essential for moisture management in building envelopes, with Z-flashing favored for horizontal transitions and step flashing preferred for stepped or vertical interfaces.
Key Differences Between Z-Flashing and Step Flashing
Z-flashing is a continuous, folded metal strip installed over horizontal seams to direct water away from the wall, while step flashing involves individual pieces interleaved with each course of shingles to provide thorough waterproofing around vertical surfaces. Unlike step flashing that requires multiple pieces precisely integrated with shingles to prevent leaks at roof-to-wall junctions, Z-flashing offers a simpler, quicker installation but may be less effective in complex architectural situations. The key difference lies in their application method and adaptability: Z-flashing suits horizontal joints and straightforward designs, whereas step flashing is essential for vertical walls and intricate rooflines.
Applications: When to Use Z-Flashing vs Step Flashing
Z-flashing is ideal for applications involving horizontal siding or areas where water needs to be directed away from seams, such as beneath windows or where walls meet foundation lines. Step flashing is better suited for roof-to-wall transitions and chimneys, providing durable water protection around complex angles or joints. Choosing between Z-flashing and step flashing depends on the specific building component and water exposure risks.
Materials Required for Installation
Z-flashing installation requires metal flashing strips typically made from aluminum or galvanized steel, along with corrosion-resistant fasteners and sealants to ensure water-tight seams. Step flashing installation involves overlapping pieces of metal flashing, often copper or galvanized steel, combined with roofing nails and roofing cement to secure each step and prevent moisture intrusion. Both methods necessitate precise cutting tools and protective gloves to handle sharp flashing materials safely.
Preparation Steps for Z-Flashing Installation
Proper preparation for Z-flashing installation involves thoroughly cleaning and drying the surface to ensure optimal adhesion and waterproofing. Precise measurement and cutting of the Z-flashing material are critical to fit the gaps between siding and windows or doors accurately. Sealing edges with high-quality, weather-resistant caulk enhances durability and prevents moisture infiltration, distinguishing it from step flashing preparation.
Step-by-Step Guide to Installing Z-Flashing
Z-flashing installation involves securing a metal strip over siding joints to divert water, preventing moisture infiltration more effectively than step flashing, which overlaps sequential shingles or siding pieces. Begin by measuring and cutting the Z-flashing to length, ensuring each section extends at least two inches beyond the joint to maximize water diversion. Next, fasten the flashing with corrosion-resistant nails, then cover it with siding or shingles, creating a continuous, weather-resistant barrier that helps extend the lifespan of the exterior wall system.
Step-by-Step Guide to Installing Step Flashing
Step flashing installation involves layering small, L-shaped metal pieces between the roof shingles and the vertical wall to create a watertight barrier, effectively directing water away from critical joints. Begin by securing the first piece of step flashing against the wall, overlapping it with the roof shingles, and subsequent pieces should be installed in alternating layers with each row of shingles to ensure consistent water shedding. Proper sealing and nailing at each step prevent water intrusion, setting step flashing apart from Z-flashing by providing more precise, customizable protection on pitched roofs with multiple layers.
Common Installation Mistakes and How to Avoid Them
Common installation mistakes in Z-flashing include improper alignment and inadequate sealing, leading to water infiltration and structural damage. Step flashing installation errors often involve overlapping inconsistencies and poor integration with roofing materials, causing leaks and premature failure. To avoid these issues, ensure precise placement with continuous sealing and verify each flashing overlap is securely fastened and integrated with adjacent components.
Durability and Maintenance: Z-Flashing vs Step Flashing
Z-flashing offers enhanced durability due to its continuous metal strip design that efficiently directs water away from wall openings, reducing the risk of water infiltration and damage. Maintenance of Z-flashing is generally easier since its seamless installation requires fewer joints, minimizing potential weak points compared to step flashing, which consists of overlapping pieces that may deteriorate or loosen over time. Step flashing requires more frequent inspections and repairs to ensure the individual pieces maintain their integrity, making Z-flashing a more long-term, low-maintenance solution.
Cost Comparison and Long-Term Value
Z-flashing installation typically incurs lower upfront costs due to simpler materials and faster application compared to step flashing, which requires more precise cutting and integration around roof-to-wall intersections. While step flashing offers superior durability and enhanced water resistance, reducing potential repair expenses over time, Z-flashing may necessitate more frequent maintenance, impacting long-term value. Investing in step flashing delivers greater cost efficiency in the long run through minimized leaks and prolonged roof lifespan, offsetting its initial higher installation price.
Z-flashing installation vs step flashing installation Infographic