Headwall flashing is installed where a roof meets a vertical wall, directing water away from the joint to prevent leaks and water damage. Sidewall flashing runs along the intersection of the roof and a sidewall, sealing the gap to protect against moisture infiltration. Both types of flashing are essential for maintaining roof integrity and preventing structural issues caused by water penetration.
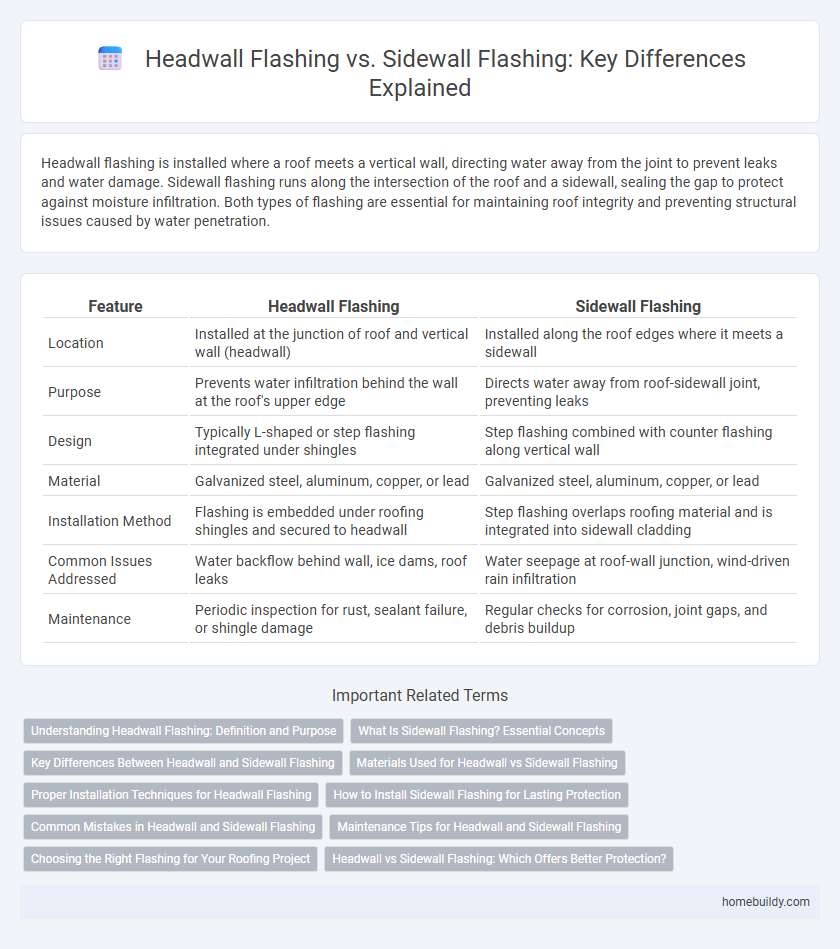
Table of Comparison
| Feature | Headwall Flashing | Sidewall Flashing |
|---|---|---|
| Location | Installed at the junction of roof and vertical wall (headwall) | Installed along the roof edges where it meets a sidewall |
| Purpose | Prevents water infiltration behind the wall at the roof's upper edge | Directs water away from roof-sidewall joint, preventing leaks |
| Design | Typically L-shaped or step flashing integrated under shingles | Step flashing combined with counter flashing along vertical wall |
| Material | Galvanized steel, aluminum, copper, or lead | Galvanized steel, aluminum, copper, or lead |
| Installation Method | Flashing is embedded under roofing shingles and secured to headwall | Step flashing overlaps roofing material and is integrated into sidewall cladding |
| Common Issues Addressed | Water backflow behind wall, ice dams, roof leaks | Water seepage at roof-wall junction, wind-driven rain infiltration |
| Maintenance | Periodic inspection for rust, sealant failure, or shingle damage | Regular checks for corrosion, joint gaps, and debris buildup |
Understanding Headwall Flashing: Definition and Purpose
Headwall flashing is a critical waterproofing component installed where a roof meets a vertical wall, designed to direct water away from the joint to prevent leaks and structural damage. Unlike sidewall flashing, which addresses water infiltration along sidewalls, headwall flashing specifically seals the intersection between roof surfaces and headwalls, ensuring proper drainage and protection. Proper installation of headwall flashing involves embedding a metal or flexible flashing material into the wall and overlapping the roofing membrane, enhancing building envelope durability and moisture resistance.
What Is Sidewall Flashing? Essential Concepts
Sidewall flashing is a critical roofing component designed to seal the joint where a roof meets a vertical wall, preventing water infiltration and protecting the structure from moisture damage. Unlike headwall flashing, which is installed at the intersection of the roof and a horizontal wall or parapet, sidewall flashing must be carefully integrated with roofing materials such as shingles or membrane to create a continuous, waterproof barrier. Proper installation involves overlapping the flashing over the roofing and up the vertical wall, often secured with metal counter-flashing for added durability and weather resistance.
Key Differences Between Headwall and Sidewall Flashing
Headwall flashing is installed at the junction where a roof meets a vertical wall, creating a watertight seal that directs water away from the roof and wall intersection, while sidewall flashing is used along the intersection where the roof meets a side wall or chimney, preventing water infiltration along the roof's edge. The key difference lies in their placement and function: headwall flashing accommodates roof-to-wall transitions parallel to the roof slope, whereas sidewall flashing manages water flow around protruding vertical structures. Material choice for both typically includes metal or rubberized membranes, with precise installation critical to prevent leaks and ensure long-term roof integrity.
Materials Used for Headwall vs Sidewall Flashing
Headwall flashing is typically crafted from durable materials like aluminum, copper, or galvanized steel, chosen for their ability to withstand direct exposure to roof flashes meeting vertical walls. Sidewall flashing often utilizes similar metals but may also incorporate flexible materials such as rubberized asphalt or EPDM to accommodate movement and prevent water penetration along horizontal roof-to-wall transitions. The selection of materials depends on environmental factors, durability requirements, and compatibility with roofing substrates to ensure optimal waterproofing performance.
Proper Installation Techniques for Headwall Flashing
Proper installation techniques for headwall flashing include securely integrating the flashing beneath the roofing material and extending it up the wall to direct water away from the structure. Using corrosion-resistant materials like aluminum or galvanized steel ensures durability and longevity, while sealing all seams with high-quality roofing sealant prevents water infiltration. Correctly installing headwall flashing prevents leaks at roof-wall intersections, maintaining the building envelope's integrity.
How to Install Sidewall Flashing for Lasting Protection
Installing sidewall flashing requires precise integration with roofing materials to prevent water infiltration along vertical walls. Begin by securing the metal flashing against the sidewall, ensuring it extends beneath the roof shingles and overlaps properly with the roofing underlayment for optimal waterproofing. Seal all edges with high-quality roofing cement or sealant to create a durable barrier resisting wind-driven rain and ice damage.
Common Mistakes in Headwall and Sidewall Flashing
Common mistakes in headwall flashing include improper integration with roofing materials, leading to water infiltration and wood rot. Sidewall flashing errors often involve insufficient overlap and poor sealing at joints, causing leaks and structural damage. Both require precise installation to ensure waterproofing and durability in roof-wall intersections.
Maintenance Tips for Headwall and Sidewall Flashing
Headwall flashing requires regular inspection for cracks or separation to prevent water infiltration at the junction between the roof and vertical walls. Sidewall flashing maintenance involves clearing debris buildup and checking for rust or damage along the wall-roof interface to ensure a watertight seal. Applying sealant and replacing worn materials promptly can extend the lifespan of both headwall and sidewall flashing systems.
Choosing the Right Flashing for Your Roofing Project
Selecting the right flashing is critical for effective roof waterproofing, with headwall flashing designed to seal the intersection where the roof meets a vertical wall, and sidewall flashing specifically engineered to protect the junction between the side of a building and the roof slope. Headwall flashing typically integrates with roofing materials to divert water away from the wall, while sidewall flashing often incorporates drip edges or step flashing to channel water safely off the roof. Understanding the unique structural challenges and water flow patterns of your roofing project ensures the appropriate flashing choice minimizes leaks and extends roof longevity.
Headwall vs Sidewall Flashing: Which Offers Better Protection?
Headwall flashing is installed where a roof meets a vertical wall, directing water away from the joint to prevent leaks, while sidewall flashing is positioned along the edges where the roof meets a sidewall or chimney. Headwall flashing generally offers better protection in these critical junctions by providing a continuous barrier against water infiltration, especially in areas with heavy rainfall or snow accumulation. However, both types are essential in a comprehensive roofing system to ensure maximum protection against moisture intrusion.
Headwall Flashing vs Sidewall Flashing Infographic