Drip edge installation involves adding a new metal flashing along the roof edges to direct water away from the fascia and prevent damage to the underlying structure. Drip edge replacement entails removing old or damaged flashing to restore effective water drainage and protect against leaks and rot. Proper installation or timely replacement of drip edge is essential for maintaining roof integrity and preventing costly repairs.
Table of Comparison
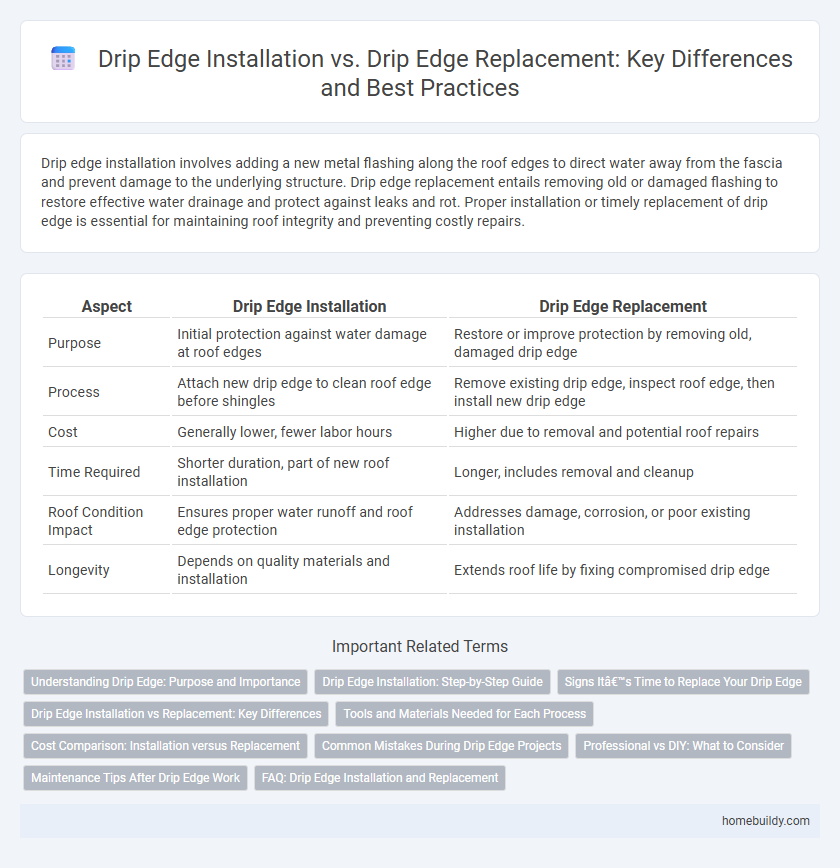
| Aspect | Drip Edge Installation | Drip Edge Replacement |
|---|---|---|
| Purpose | Initial protection against water damage at roof edges | Restore or improve protection by removing old, damaged drip edge |
| Process | Attach new drip edge to clean roof edge before shingles | Remove existing drip edge, inspect roof edge, then install new drip edge |
| Cost | Generally lower, fewer labor hours | Higher due to removal and potential roof repairs |
| Time Required | Shorter duration, part of new roof installation | Longer, includes removal and cleanup |
| Roof Condition Impact | Ensures proper water runoff and roof edge protection | Addresses damage, corrosion, or poor existing installation |
| Longevity | Depends on quality materials and installation | Extends roof life by fixing compromised drip edge |
Understanding Drip Edge: Purpose and Importance
Drip edge installation involves applying a metal flashing at the roof's edge to direct water away from the fascia and prevent water damage, ensuring the roof's durability. Drip edge replacement is necessary when the existing flashing shows signs of corrosion, warping, or detachment, which can compromise water drainage and lead to structural issues. Understanding the crucial role of drip edge in maintaining roof integrity highlights its importance in both initial installation and timely replacement to avoid costly repairs.
Drip Edge Installation: Step-by-Step Guide
Drip edge installation involves carefully aligning metal flashing along roof edges to direct water away from the fascia and underlying roofing components, preventing water damage and erosion. Start by measuring and cutting the drip edge to fit the roof perimeter, fastening it with corrosion-resistant nails placed 8 to 10 inches apart and ensuring overlaps of at least 2 inches for continuous water flow. Proper installation enhances roof durability by protecting the deck from moisture infiltration, extending the lifespan of shingles and underlying structures.
Signs It’s Time to Replace Your Drip Edge
Signs it's time to replace your drip edge include visible rust, bent or warped metal, and gaps that allow water to seep underneath roofing materials. Peeling paint or water stains on the fascia and soffit are key indicators of failing-drip edge functionality. Proper drip edge replacement prevents water damage and helps maintain roofing integrity by directing water away from the roof deck.
Drip Edge Installation vs Replacement: Key Differences
Drip edge installation involves placing new metal flashing along roof edges to direct water away and protect the underlying structure, while drip edge replacement entails removing deteriorated or damaged flashing before installing new material. Installation is typically performed during new roof construction or when adding drip edges where none existed, whereas replacement occurs during roof repairs or upgrades to address corrosion, warping, or improper fitting. Proper drip edge installation or replacement ensures enhanced roof durability, prevents water infiltration, and extends the lifespan of roofing systems.
Tools and Materials Needed for Each Process
Drip edge installation requires roofing nails, a hammer or nail gun, a tape measure, tin snips, and the drip edge material itself, typically aluminum or galvanized steel, along with roofing underlayment and sealant for proper waterproofing. Drip edge replacement involves similar tools but also necessitates a pry bar or roofing shovel to remove the old drip edge without damaging existing shingles or the roof deck. Both processes demand safety equipment such as gloves and a ladder, but replacement often requires additional sealant or roofing cement to ensure a secure, leak-proof fit with the newly installed drip edge.
Cost Comparison: Installation versus Replacement
Drip edge installation typically costs between $1.50 and $3.00 per linear foot, depending on material quality and labor rates, while replacement expenses range from $3.00 to $6.00 per linear foot due to the added labor of removing old materials and potential roof repairs. Installation is more cost-effective for new roofs or when upgrading without damage, whereas replacement incurs higher costs tied to the complexity of existing roof conditions. Homeowners should consider long-term durability and potential roofing issues when evaluating these pricing differences for drip edge services.
Common Mistakes During Drip Edge Projects
Incorrect measurements and improper fastener placement are common mistakes during both drip edge installation and replacement, often causing water to seep under roofing materials. Neglecting to remove old drip edges during replacement can lead to poor adhesion and corrosion, compromising roof protection. Failure to overlap drip edge sections correctly reduces efficiency in directing water away from the fascia, increasing the risk of water damage.
Professional vs DIY: What to Consider
Professional drip edge installation ensures precise alignment, secure fastening, and proper integration with roofing materials, reducing risks of water damage and extending roof lifespan. DIY installation may save initial costs but requires roofing knowledge, specialized tools, and time to avoid mistakes like improper sealing or misalignment that compromise protection. Consider professional services for guaranteed warranty, compliance with local building codes, and enhanced durability versus the potential errors and safety risks inherent in DIY drip edge replacement.
Maintenance Tips After Drip Edge Work
Proper maintenance after drip edge installation or replacement includes regular inspections to check for rust, loose nails, or damage that could compromise water diversion. Cleaning debris from the edge and ensuring clear gutters prevents water buildup that might lead to leaks or soffit rot. Applying rust-resistant paint or sealant extends the lifespan of the drip edge and maintains its effectiveness in protecting roof edges.
FAQ: Drip Edge Installation and Replacement
Drip edge installation involves placing new metal flashing at roof edges to direct water away from fascia and underlying roofing components, preventing water damage and improving roof longevity. Drip edge replacement is necessary when existing flashing is corroded, bent, or improperly installed, which can lead to water infiltration and structural issues. Proper drip edge installation or replacement ensures optimal roof drainage, protects roof decking, and maintains the integrity of gutters and fascia boards.
Drip edge installation vs Drip edge replacement Infographic