Skylight frame installation involves fitting a new frame during the initial setup of a skylight, ensuring proper alignment and weatherproofing for optimal performance. Skylight frame replacement focuses on removing an existing, often deteriorated frame and installing a new one to restore structural integrity and prevent leaks. Both processes require precision and expertise to maintain energy efficiency and enhance natural lighting.
Table of Comparison
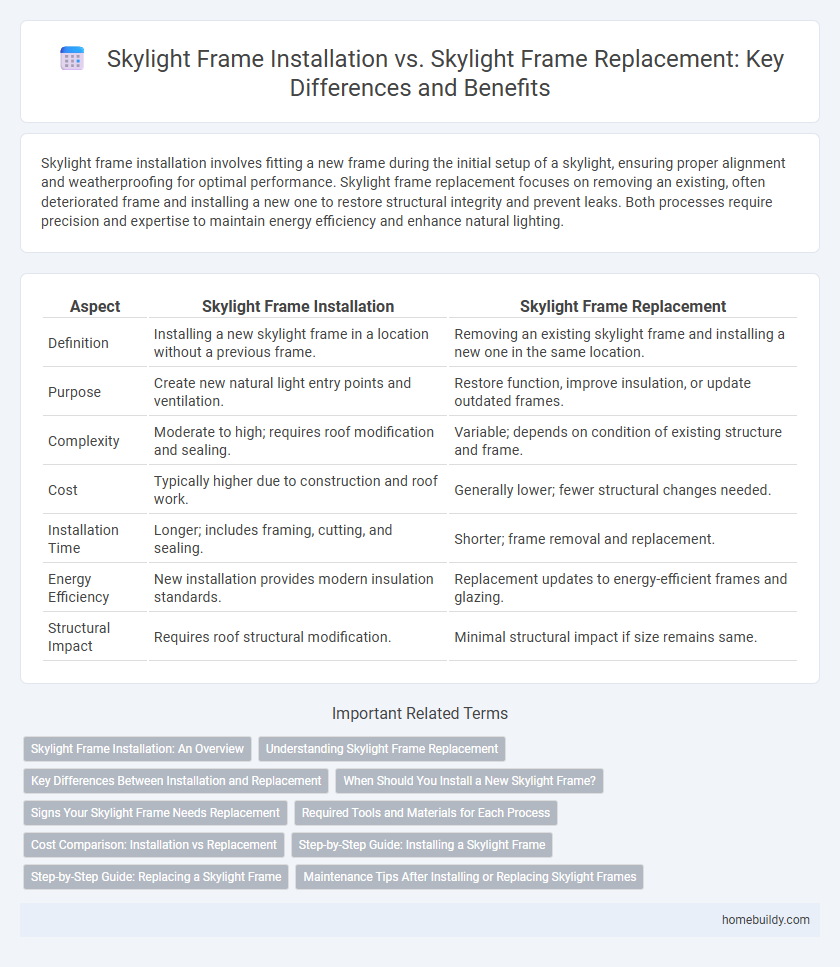
| Aspect | Skylight Frame Installation | Skylight Frame Replacement |
|---|---|---|
| Definition | Installing a new skylight frame in a location without a previous frame. | Removing an existing skylight frame and installing a new one in the same location. |
| Purpose | Create new natural light entry points and ventilation. | Restore function, improve insulation, or update outdated frames. |
| Complexity | Moderate to high; requires roof modification and sealing. | Variable; depends on condition of existing structure and frame. |
| Cost | Typically higher due to construction and roof work. | Generally lower; fewer structural changes needed. |
| Installation Time | Longer; includes framing, cutting, and sealing. | Shorter; frame removal and replacement. |
| Energy Efficiency | New installation provides modern insulation standards. | Replacement updates to energy-efficient frames and glazing. |
| Structural Impact | Requires roof structural modification. | Minimal structural impact if size remains same. |
Skylight Frame Installation: An Overview
Skylight frame installation involves fitting a new frame where none existed previously, requiring precise measurements and structural adjustments to ensure optimal natural light and ventilation. This process emphasizes integrating the skylight seamlessly with roofing materials to maintain weatherproofing and energy efficiency. Professional installation enhances durability and maximizes the benefits of daylighting, contrasting with replacement which focuses on repairing or upgrading existing frames.
Understanding Skylight Frame Replacement
Skylight frame replacement involves removing the existing frame to address structural damage, leaks, or outdated materials, ensuring improved durability and energy efficiency. Unlike installation, which can be part of new construction or additions, replacement targets preserving roof integrity while upgrading the frame components. Proper skylight frame replacement requires precise measurements and high-quality materials to maintain weather tightness and enhance natural light entry.
Key Differences Between Installation and Replacement
Skylight frame installation involves setting up a new frame where none existed before, requiring precise measurements and integration with the roof structure to ensure proper sealing and insulation. Skylight frame replacement focuses on removing and discarding the existing frame, addressing potential structural damage or wear, and ensuring compatibility with new skylight units. Key differences include the extent of roof modification, the condition of the existing structure, and the scope of labor, with replacement typically demanding more extensive repairs and preparation.
When Should You Install a New Skylight Frame?
Install a new skylight frame when the existing structure shows signs of severe water damage, extensive rot, or warping that compromises its integrity and leads to leaks. If the current frame cannot support modern energy-efficient glazing or lacks compatibility with advanced sealing technologies, replacement ensures improved insulation and durability. Choose installation over repair when the cost and effort of fixing the old frame exceed the benefits of a new, properly fitted skylight frame designed for optimal performance and weather resistance.
Signs Your Skylight Frame Needs Replacement
Visible warping, persistent leaks, and excessive condensation around your skylight frame are clear signs that it requires replacement rather than mere installation. Cracks in the frame or deterioration due to prolonged UV exposure compromise structural integrity and energy efficiency, indicating that repair will not suffice. Timely replacement of damaged skylight frames prevents further water damage and enhances insulation, maintaining optimal indoor comfort and reducing energy costs.
Required Tools and Materials for Each Process
Installing a skylight frame requires tools such as a measuring tape, circular saw, drill, screwdriver, level, and flashing materials along with roofing nails or screws to ensure proper sealing and waterproofing. Replacing a skylight frame involves similar tools but may also require pry bars, utility knives, and sealant removers to carefully remove the old frame and prepare the surface for the new installation. Both processes demand safety equipment like gloves and goggles, with replacement often needing additional caulking and weatherproofing materials to address any existing structural wear.
Cost Comparison: Installation vs Replacement
Skylight frame installation typically costs between $300 to $800 depending on size and material, while replacement expenses can range from $600 to $1,200 due to additional labor and disposal fees. Installation involves setting up a new frame in an existing opening, making it less labor-intensive and more affordable than replacement, which requires removing the old frame and making structural adjustments. Homeowners should evaluate the condition of their current skylight frame before deciding, as replacement often proves more cost-effective long-term when addressing leaks or frame damage.
Step-by-Step Guide: Installing a Skylight Frame
Installing a skylight frame involves precise measurement of the roof opening followed by securely attaching the frame to the rafters using corrosion-resistant screws to ensure durability and weather resistance. Proper flashing installation around the frame is critical to prevent water infiltration, while sealing with high-quality silicone or roofing sealant enhances insulation and energy efficiency. This step-by-step process differs from skylight frame replacement, which typically requires removal of the existing frame before fitting a new one, often involving additional structural adjustments.
Step-by-Step Guide: Replacing a Skylight Frame
Replacing a skylight frame involves carefully removing the existing frame, inspecting the surrounding roof structure for damage, and ensuring a precise fit for the new frame to prevent leaks and improve insulation. Start by clearing the old sealant and fasteners, then lift out the old frame before positioning and securing the new skylight frame with appropriate flashing and weatherproofing materials. Proper alignment and sealing are crucial to maintain the skylight's integrity and energy efficiency during the frame replacement process.
Maintenance Tips After Installing or Replacing Skylight Frames
Skylight frame maintenance after installation or replacement is crucial to ensure durability and prevent leaks. Regularly inspect the sealing and flashing around the frame to avoid water infiltration and check for signs of wear or damage. Cleaning debris from the skylight surface and ensuring proper ventilation will also extend the lifespan of the skylight frame and maintain energy efficiency.
Skylight frame installation vs skylight frame replacement Infographic