Roof valley installation involves creating a watertight channel where two roof slopes meet, ensuring efficient water drainage and preventing leaks. Chimney flashing installation focuses on sealing the joint between the chimney and the roof to protect against water infiltration and damage. Both require precise workmanship and durable materials to maintain the roof's integrity and prevent costly repairs.
Table of Comparison
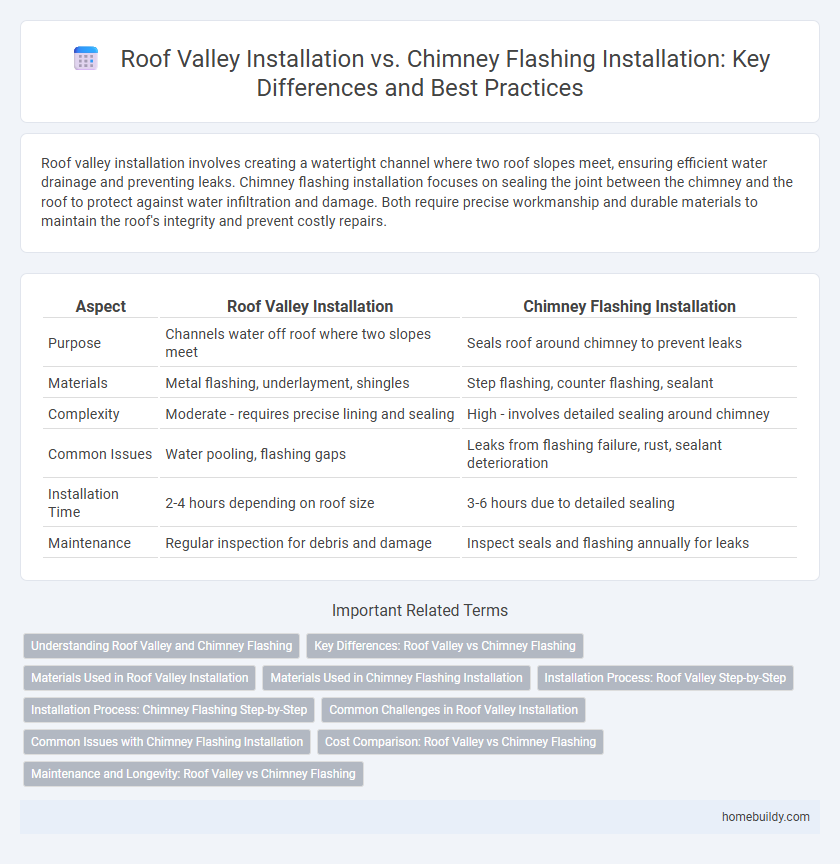
| Aspect | Roof Valley Installation | Chimney Flashing Installation |
|---|---|---|
| Purpose | Channels water off roof where two slopes meet | Seals roof around chimney to prevent leaks |
| Materials | Metal flashing, underlayment, shingles | Step flashing, counter flashing, sealant |
| Complexity | Moderate - requires precise lining and sealing | High - involves detailed sealing around chimney |
| Common Issues | Water pooling, flashing gaps | Leaks from flashing failure, rust, sealant deterioration |
| Installation Time | 2-4 hours depending on roof size | 3-6 hours due to detailed sealing |
| Maintenance | Regular inspection for debris and damage | Inspect seals and flashing annually for leaks |
Understanding Roof Valley and Chimney Flashing
Roof valley installation involves creating a waterproof channel where two roof slopes meet, directing water away efficiently to prevent leaks. Chimney flashing installation focuses on sealing the junction between the chimney and roof to stop water infiltration through this vulnerable point. Both installations require precise fitting and high-quality materials, but roof valleys handle larger water flow while chimney flashing addresses structural intersections.
Key Differences: Roof Valley vs Chimney Flashing
Roof valley installation involves creating a waterproof channel at the intersection of two roof slopes to direct water off the roof efficiently, while chimney flashing installation focuses on sealing the joints where the chimney meets the roof to prevent leaks. Roof valleys require precise alignment and layering of roofing materials to handle heavy water flow, whereas chimney flashing uses flexible metal flashing materials like aluminum or lead to accommodate chimney expansion and roof movement. The key difference lies in their function and placement: roof valleys manage large volumes of runoff within the roof plane, while chimney flashing protects vulnerable chimney-to-roof seams from water infiltration.
Materials Used in Roof Valley Installation
Roof valley installation typically uses durable materials such as galvanized steel, aluminum, copper, or lead to ensure watertight protection where two roof slopes meet, preventing leaks and facilitating proper water drainage. These materials are chosen for their corrosion resistance and flexibility to conform to the valley's shape, unlike chimney flashing which often requires more specialized components like step flashing and counter flashing made from thinner, more malleable metals to fit around chimney masonry. The choice of metals in roof valleys directly affects the roof's longevity and resistance to weather-related damage, emphasizing the importance of selecting high-quality, corrosion-resistant materials.
Materials Used in Chimney Flashing Installation
Chimney flashing installation typically uses durable metals such as galvanized steel, aluminum, copper, or lead, chosen for their corrosion resistance and flexibility in creating watertight seals around chimney bases. These materials are formed into step flashing and counter flashing to prevent water infiltration, ensuring long-term protection against leaks. Roof valley installation, by contrast, primarily employs corrosion-resistant metal strips or pre-formed valley liners integrated with roofing shingles for efficient water drainage.
Installation Process: Roof Valley Step-by-Step
Roof valley installation involves precise alignment of valley metal or underlayment to direct water flow efficiently, starting with clearing the valley area and securing the valley liner before placing shingles on each roof slope. The process requires careful measurement and cutting of shingles to fit tightly alongside the valley metal, ensuring watertight seams and preventing leaks. Unlike chimney flashing that focuses on sealing around protrusions, roof valley installation emphasizes creating a continuous, sharp channel for drainage along intersecting roof planes.
Installation Process: Chimney Flashing Step-by-Step
Chimney flashing installation requires precise layering of metal sheets to prevent water infiltration at the roof-chimney junction, starting with securing the base flashing under the shingles. Step-by-step, counter-flashing is then embedded into the chimney mortar joints, overlapping the base flashing to create a watertight seal. This process contrasts with roof valley installation, which primarily involves shaping metal or membranes along intersecting roof planes to channel water efficiently.
Common Challenges in Roof Valley Installation
Roof valley installation commonly faces challenges such as ensuring proper waterproofing and alignment to prevent leaks, which differs from chimney flashing that requires precise sealing around complex protrusions. Incorrect valley installation often leads to water pooling and accelerated roof material deterioration, demanding meticulous attention to flashing overlap and valley liner placement. Durability issues arise from improper valley cuts and valley metal misalignment, highlighting the need for skilled workmanship compared to chimney flashing's unique sealing demands.
Common Issues with Chimney Flashing Installation
Common issues with chimney flashing installation include improper sealing, which can lead to water leaks and roof damage, and incorrect flashing material that may corrode or fail prematurely. Roof valley installation generally involves simpler water management with fewer leak points, while chimney flashing requires precise fitting around irregular chimney surfaces to prevent moisture infiltration. Poor chimney flashing installation often results in costly repairs due to water damage inside the home, making it crucial to follow manufacturer guidelines and use high-quality materials.
Cost Comparison: Roof Valley vs Chimney Flashing
Roof valley installation generally involves more extensive materials and labor due to its larger surface area and complexity, leading to higher costs compared to chimney flashing. Chimney flashing typically requires specialized but less extensive sealing around the chimney base, making it a more cost-effective option in terms of both materials and labor. Homeowners should consider the durability and long-term maintenance expenses, as roof valleys bear significant water flow and may necessitate more frequent repairs than chimney flashing.
Maintenance and Longevity: Roof Valley vs Chimney Flashing
Roof valley installation requires regular inspection to clear debris and prevent water pooling that can cause leaks, with maintenance intervals typically every 1-2 years enhancing longevity up to 20-30 years depending on material quality. Chimney flashing installation demands close monitoring for rust, cracks, or sealant deterioration, as these failures often lead to water infiltration; with timely repairs, chimney flashing can last 15-25 years. Both systems benefit from professional assessments, but roof valleys generally endure longer due to broader coverage areas and robust metal materials used in their construction.
Roof valley installation vs Chimney flashing installation Infographic