DIY peephole installation offers a budget-friendly and quick solution for enhancing home security by allowing homeowners to easily create a viewing point in their door. Professional installation ensures precise alignment, proper sealing, and minimizes the risk of damaging the door, resulting in a more durable and reliable peephole setup. Choosing between DIY and professional installation depends on skill level, tool availability, and the desired quality of security enhancement.
Table of Comparison
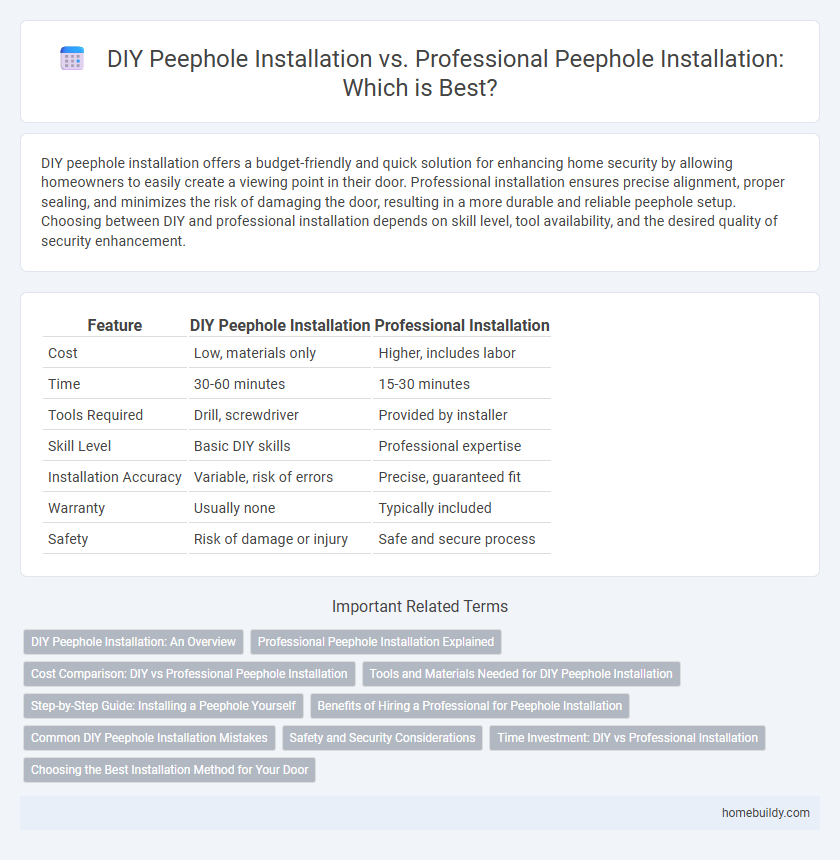
| Feature | DIY Peephole Installation | Professional Installation |
|---|---|---|
| Cost | Low, materials only | Higher, includes labor |
| Time | 30-60 minutes | 15-30 minutes |
| Tools Required | Drill, screwdriver | Provided by installer |
| Skill Level | Basic DIY skills | Professional expertise |
| Installation Accuracy | Variable, risk of errors | Precise, guaranteed fit |
| Warranty | Usually none | Typically included |
| Safety | Risk of damage or injury | Safe and secure process |
DIY Peephole Installation: An Overview
DIY peephole installation offers an affordable and straightforward solution for enhancing home security by allowing homeowners to see visitors without opening the door. Basic tools like a drill, screw, and measuring tape are all that's required, making it accessible even for beginners. Precise measurements and careful drilling ensure a clear, functional peephole, providing a cost-effective alternative to professional services.
Professional Peephole Installation Explained
Professional peephole installation ensures precise alignment and secure fitting, preventing drafts and enhancing security by using high-quality materials and specialized tools. Experts accurately measure door thickness and select the appropriate peephole size, minimizing errors and ensuring optimal viewing angles. This service often includes warranty protection and adherence to safety standards, providing homeowners peace of mind and long-term durability.
Cost Comparison: DIY vs Professional Peephole Installation
DIY peephole installation typically costs between $5 and $20 for materials, primarily the peephole viewer and basic tools, offering significant savings compared to professional installation. Professional installation fees range from $50 to $150, factoring in labor and potential service charges, which may be justified by precise fitting and warranty coverage. Choosing DIY reduces upfront costs but may risk improper installation, while professional services provide expertise at a higher but often more reliable expense.
Tools and Materials Needed for DIY Peephole Installation
DIY peephole installation requires basic tools such as a drill with an appropriate drill bit, a screwdriver, a tape measure, and a pencil for marking. Essential materials include a peephole viewer kit, which typically contains the door viewer lens assembly and mounting hardware. Ensuring the correct hole diameter and door thickness compatibility is crucial for a secure and functional fit.
Step-by-Step Guide: Installing a Peephole Yourself
Installing a peephole yourself involves measuring your door at eye level, drilling a hole through the door using a drill bit that matches the peephole diameter, and then inserting and securing the peephole device on both sides of the door. Using a tape measure, pencil, and drill ensures precision, while protective eyewear enhances safety during installation. DIY installation saves money but requires careful attention to detail to avoid damaging the door or compromising the peephole's alignment and functionality.
Benefits of Hiring a Professional for Peephole Installation
Hiring a professional for peephole installation ensures precise alignment, optimal security, and prevents potential damage to the door structure. Professionals utilize specialized tools and techniques that guarantee a clean, secure fit, reducing the risk of draft or weakening the door's integrity. Their expertise also saves time and provides peace of mind with proper installation that meets safety standards.
Common DIY Peephole Installation Mistakes
Common DIY peephole installation mistakes include misaligning the peephole, which results in distorted or limited visibility, and drilling holes that are too large, compromising door security and aesthetics. Incorrect measurement or using the wrong drill bit size can cause damage to the door material, leading to costly repairs or replacement. Failure to properly seal the peephole can also allow moisture and drafts to enter, reducing energy efficiency and potentially causing damage over time.
Safety and Security Considerations
DIY peephole installation requires precise measurements and proper tools to avoid compromising door integrity, while professional installation ensures secure placement with specialized equipment that maintains door strength. Incorrect installation can create vulnerabilities, making doors easier to breach or damaged, compromising home security. Professionals also provide warranty and safety assurances, reducing risks associated with improper fit or poor visibility.
Time Investment: DIY vs Professional Installation
DIY peephole installation typically requires 30 to 60 minutes, depending on skill level and tools available, while professional installation averages 15 to 30 minutes with guaranteed precision. Homeowners must factor in potential time spent on research, measurements, and adjustments when choosing the DIY route. Professional services save time by efficiently handling measurements, drilling, and fitting, ensuring optimal security and alignment.
Choosing the Best Installation Method for Your Door
DIY peephole installation offers cost savings and quick setup, ideal for those comfortable with basic tools and standard door materials like wood or metal. Professional installation ensures precise alignment, enhanced security, and accommodates complex door types such as fiberglass or steel with reinforced cores. Evaluating factors like door material, skill level, and security needs is crucial in choosing the best peephole installation method.
DIY Peephole Installation vs Professional Installation Infographic