Door stop installation involves securely mounting a new door stop to prevent damage to walls and control door movement, often requiring minimal tools and time. In contrast, door stop replacement focuses on removing an existing, worn-out, or damaged door stop and fitting a new one that matches the door and room decor while restoring function. Proper installation and timely replacement ensure optimal door protection and extend the lifespan of both the door and walls.
Table of Comparison
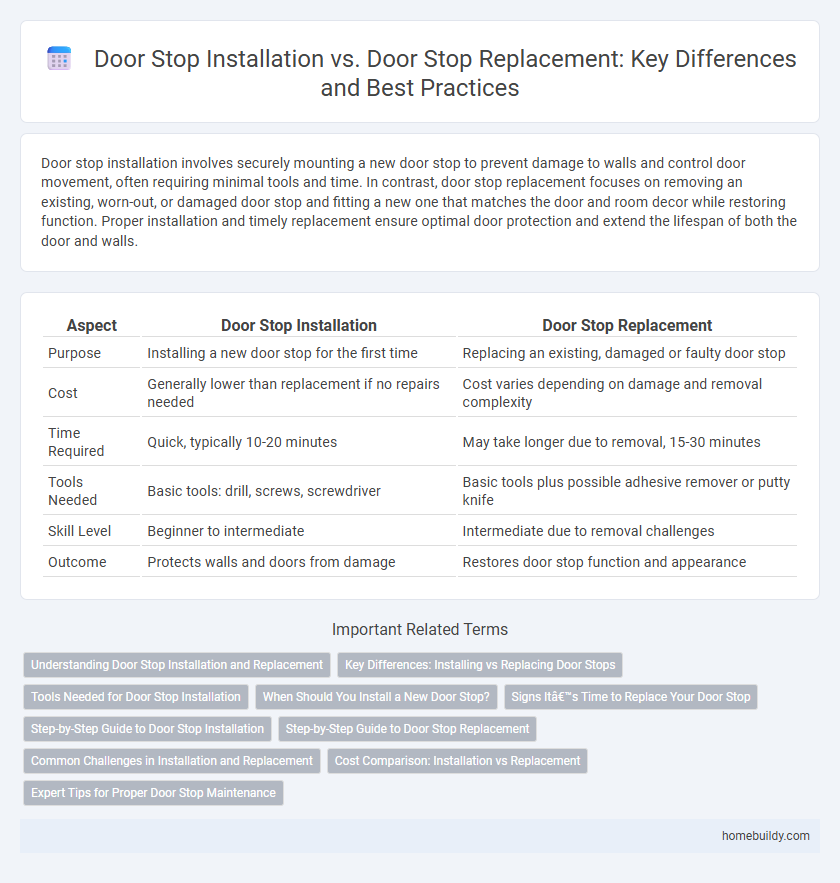
| Aspect | Door Stop Installation | Door Stop Replacement |
|---|---|---|
| Purpose | Installing a new door stop for the first time | Replacing an existing, damaged or faulty door stop |
| Cost | Generally lower than replacement if no repairs needed | Cost varies depending on damage and removal complexity |
| Time Required | Quick, typically 10-20 minutes | May take longer due to removal, 15-30 minutes |
| Tools Needed | Basic tools: drill, screws, screwdriver | Basic tools plus possible adhesive remover or putty knife |
| Skill Level | Beginner to intermediate | Intermediate due to removal challenges |
| Outcome | Protects walls and doors from damage | Restores door stop function and appearance |
Understanding Door Stop Installation and Replacement
Door stop installation ensures proper placement to protect walls and doors from damage, requiring precise measurement and mounting techniques tailored to different door types. Replacement involves removing worn or damaged stops and selecting compatible designs that maintain functionality and match existing decor. Understanding both installation and replacement helps extend the lifespan of door stops and preserve door hardware integrity.
Key Differences: Installing vs Replacing Door Stops
Door stop installation involves adding a new device to prevent door damage, focusing on proper placement and secure mounting to ensure functionality. Door stop replacement requires removing an existing stopper, often addressing wear, damage, or style updates, with attention to matching hardware types and compatibility. Key differences include the complexity of preparation, the condition of the mounting surface, and the need to remove old components before installing new ones during replacement.
Tools Needed for Door Stop Installation
Installing a door stop requires basic tools such as a drill, screwdriver, measuring tape, and wall anchors to ensure secure mounting. Accurate measurement and surface preparation are critical for proper alignment and function, minimizing door damage and wear. These tools enable efficient installation, contrasting with door stop replacement, which may only require simple unscrewing or adhesive removal.
When Should You Install a New Door Stop?
Install a new door stop when the existing one is severely damaged, missing parts, or no longer effectively preventing door damage and wall marks. Replacement is essential if the current door stop is loose, rusted, or incompatible with new door hardware, ensuring proper protection and functionality. Choosing installation over replacement depends on assessing wear, alignment issues, and doorstop material integrity to maintain optimal door and wall safety.
Signs It’s Time to Replace Your Door Stop
Worn-out rubber tips, loose mounting hardware, and visible cracks are clear signs it's time to replace your door stop rather than attempt an installation. Frequent door impacts causing floor or wall damage indicate door stop failure, necessitating replacement for effective protection. Replacing a damaged or outdated door stop ensures proper function and prevents further wear to doors and surrounding structures.
Step-by-Step Guide to Door Stop Installation
Installing a door stop involves measuring the ideal placement on the door or wall to prevent damage, marking the spot, and securely attaching the door stop using screws or adhesive depending on the type. Common tools required include a drill, screwdriver, and level to ensure precise installation for maximum protection and durability. Proper installation extends the lifespan of both doors and walls by effectively absorbing impact and reducing noise.
Step-by-Step Guide to Door Stop Replacement
Door stop replacement involves carefully removing the old door stop by unscrewing or prying it away from the wall or floor, followed by selecting a compatible new door stop that fits the existing mounting hardware. Next, align the new door stop's base with the pre-drilled holes, securing it firmly with screws or adhesive depending on the model, ensuring it effectively prevents door damage. Properly installed door stops not only protect walls and doors but also enhance the overall functionality and aesthetics of the space.
Common Challenges in Installation and Replacement
Door stop installation often faces challenges such as improper alignment, resulting in ineffective door protection, and difficulty securing the stop to various door frame materials. Replacement tasks commonly encounter issues including mismatched sizes or styles, causing poor fit and aesthetic inconsistencies, as well as wear or damage to the mounting surface complicating secure attachment. Both processes require precise measurement and appropriate hardware selection to ensure durability and optimal functionality.
Cost Comparison: Installation vs Replacement
Door stop installation typically costs between $10 and $50, depending on the type and labor involved, while replacement expenses can range from $20 to $100 due to the need to remove old hardware and potentially repair door damage. Installation is often more affordable as it involves minimal preparation and straightforward mounting, whereas replacement may require additional materials and skilled labor to ensure compatibility. Homeowners seeking cost efficiency usually prefer installation unless the existing door stop is significantly worn or damaged, making replacement a necessary investment.
Expert Tips for Proper Door Stop Maintenance
Proper door stop installation ensures secure positioning and prevents floor or wall damage by selecting the right type and correct placement. Expert tips for door stop replacement emphasize assessing wear and tear, matching the new stop to the existing hardware, and using appropriate tools for a snug fit. Routine maintenance involves cleaning, tightening screws, and inspecting for cracks to prolong door stop functionality and protect door frames.
Door Stop Installation vs Door Stop Replacement Infographic