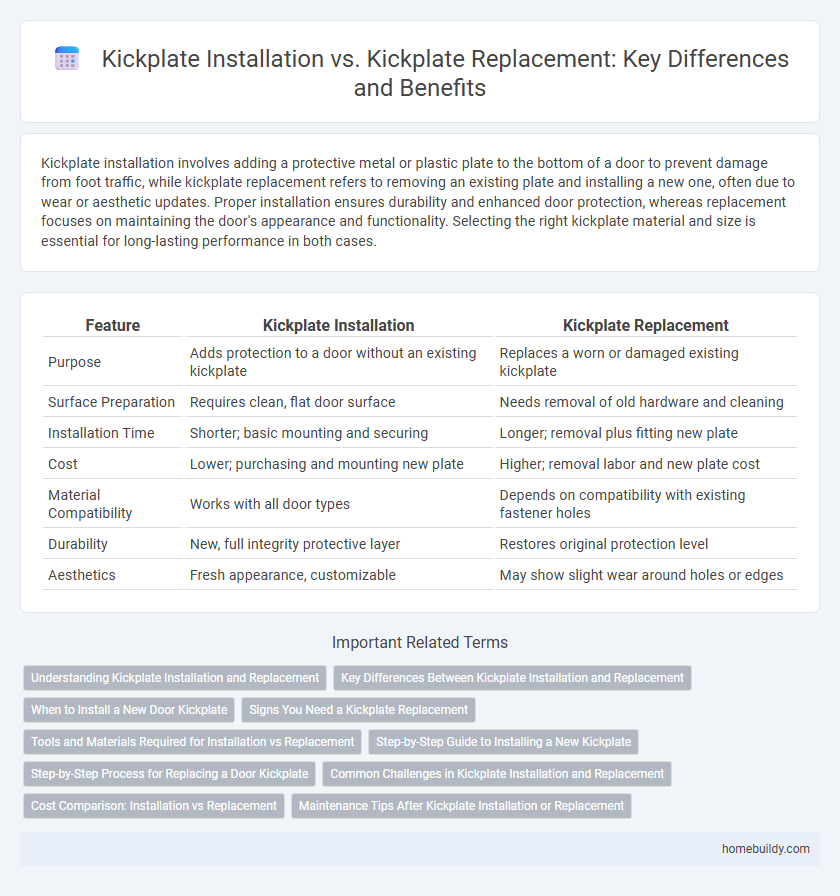
Kickplate installation involves adding a protective metal or plastic plate to the bottom of a door to prevent damage from foot traffic, while kickplate replacement refers to removing an existing plate and installing a new one, often due to wear or aesthetic updates. Proper installation ensures durability and enhanced door protection, whereas replacement focuses on maintaining the door's appearance and functionality. Selecting the right kickplate material and size is essential for long-lasting performance in both cases.
Table of Comparison
| Feature | Kickplate Installation | Kickplate Replacement |
|---|---|---|
| Purpose | Adds protection to a door without an existing kickplate | Replaces a worn or damaged existing kickplate |
| Surface Preparation | Requires clean, flat door surface | Needs removal of old hardware and cleaning |
| Installation Time | Shorter; basic mounting and securing | Longer; removal plus fitting new plate |
| Cost | Lower; purchasing and mounting new plate | Higher; removal labor and new plate cost |
| Material Compatibility | Works with all door types | Depends on compatibility with existing fastener holes |
| Durability | New, full integrity protective layer | Restores original protection level |
| Aesthetics | Fresh appearance, customizable | May show slight wear around holes or edges |
Understanding Kickplate Installation and Replacement
Kickplate installation involves securely attaching a protective metal or plastic plate to the lower portion of a door to prevent damage from foot traffic, whereas kickplate replacement focuses on removing a worn or damaged kickplate and installing a new one. Proper measurement and alignment are critical during installation to ensure durability and aesthetic appeal, while replacement requires careful removal to avoid damaging the door surface. Both processes require appropriate tools and materials, such as screws, adhesives, or rivets, depending on the kickplate type and door material.
Key Differences Between Kickplate Installation and Replacement
Kickplate installation involves attaching a new protective plate to a door for the first time, often enhancing durability and preventing damage from foot traffic. Kickplate replacement focuses on removing an existing worn or damaged plate and installing a new one to restore the door's appearance and functionality. Key differences include the condition of the door surface--clean and undamaged for installation versus potentially requiring surface preparation during replacement--and the potential need for hardware removal during replacement.
When to Install a New Door Kickplate
Install a new door kickplate when the existing one shows signs of severe corrosion, significant dents, or peeling that compromise both protection and aesthetic appeal. Replacement is essential if the kickplate no longer aligns properly due to door warping or hardware changes, ensuring optimal defense against impact damage. Choosing installation over replacement depends on assessing the door's structural integrity and wear level, as well as the kickplate material's durability in high-traffic areas.
Signs You Need a Kickplate Replacement
Visible dents, extensive scratches, or corrosion on a door kickplate are clear indicators that a kickplate replacement is necessary rather than a simple installation. If the kickplate no longer adheres properly due to warped metal or damaged mounting holes, it compromises door protection and requires replacement. Frequent wear in high-traffic areas also signals that the existing kickplate has reached the end of its functional lifespan and needs to be swapped out to maintain door integrity.
Tools and Materials Required for Installation vs Replacement
Kickplate installation requires basic tools such as a drill, screws, measuring tape, and a level, along with the kickplate itself, usually made of aluminum or stainless steel. Kickplate replacement often demands additional materials like new mounting brackets, adhesive compounds, or filler putty to repair any damage from the previous plate. Both processes benefit from protective gloves and safety glasses to ensure proper handling and safety during installation or replacement.
Step-by-Step Guide to Installing a New Kickplate
Installing a new door kickplate begins with measuring the door width accurately to ensure a perfect fit, followed by marking the placement at the bottom edge. Next, align the kickplate with the marks and secure it using screws or adhesive depending on the material and door type, ensuring a flush and sturdy attachment. Replacing a kickplate involves removing the old one carefully by unscrewing or peeling off adhesive, then following the installation steps for the new kickplate to enhance door protection and appearance.
Step-by-Step Process for Replacing a Door Kickplate
Replacing a door kickplate involves first removing the existing plate by unscrewing or prying it off carefully to avoid damage to the door surface. Next, clean the area thoroughly to remove dirt or adhesive residue, ensuring a smooth surface for the new kickplate installation. Finally, align the new kickplate precisely, secure it with screws or adhesive depending on the model, and check for a snug fit to provide durable protection and enhance the door's appearance.
Common Challenges in Kickplate Installation and Replacement
Kickplate installation challenges often include ensuring proper alignment and securing the plate to prevent loosening over time, which can compromise door protection. In kickplate replacement, difficulties arise from removing old adhesive residues or fasteners without damaging the door surface, as well as matching the new kickplate size and finish to the existing door design. Both processes require attention to door material compatibility and precise measurements to maintain door integrity and aesthetics.
Cost Comparison: Installation vs Replacement
Kickplate installation typically incurs lower initial costs, ranging from $20 to $100 depending on material and door size, while replacement expenses can escalate to $150 or more due to labor and removal fees. Installation involves attaching a new kickplate to a door without removing any existing hardware, minimizing labor time and associated charges. Replacement requires careful removal of the old kickplate, potential door surface repairs, and installation of a new plate, which increases both material and labor costs significantly.
Maintenance Tips After Kickplate Installation or Replacement
Proper maintenance after kickplate installation or replacement prolongs durability and preserves aesthetics. Regular cleaning with mild detergent and avoiding abrasive tools prevent surface damage, while periodic inspection ensures screws remain tight and the plate stays securely fastened. Applying protective coatings can also shield the kickplate from corrosion and wear, enhancing its lifespan.
Kickplate installation vs kickplate replacement Infographic