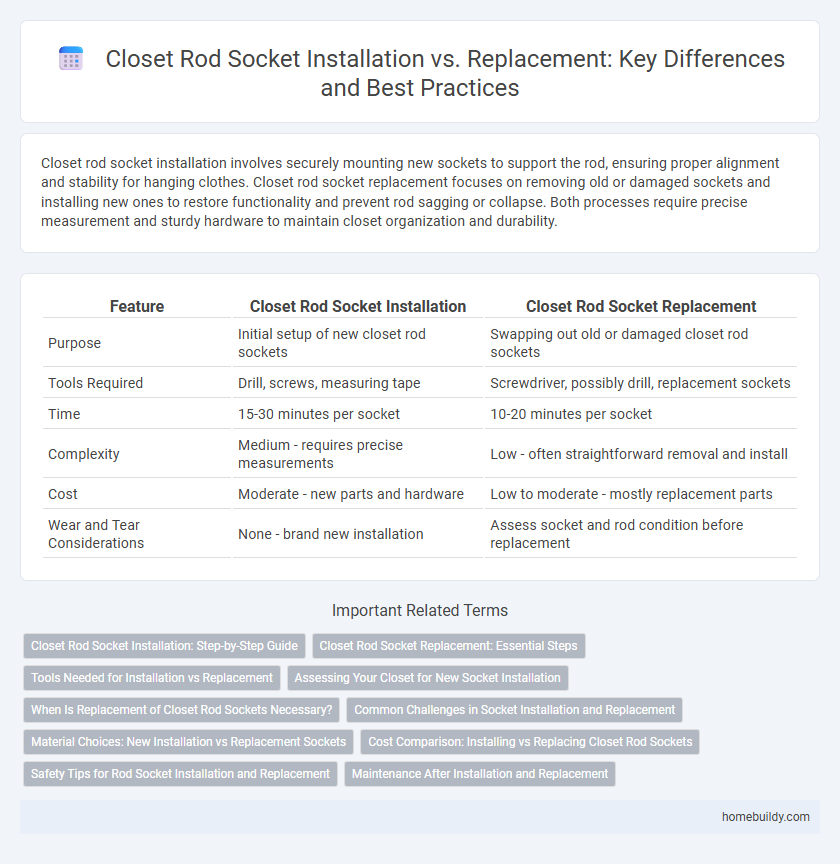
Closet rod socket installation involves securely mounting new sockets to support the rod, ensuring proper alignment and stability for hanging clothes. Closet rod socket replacement focuses on removing old or damaged sockets and installing new ones to restore functionality and prevent rod sagging or collapse. Both processes require precise measurement and sturdy hardware to maintain closet organization and durability.
Table of Comparison
| Feature | Closet Rod Socket Installation | Closet Rod Socket Replacement |
|---|---|---|
| Purpose | Initial setup of new closet rod sockets | Swapping out old or damaged closet rod sockets |
| Tools Required | Drill, screws, measuring tape | Screwdriver, possibly drill, replacement sockets |
| Time | 15-30 minutes per socket | 10-20 minutes per socket |
| Complexity | Medium - requires precise measurements | Low - often straightforward removal and install |
| Cost | Moderate - new parts and hardware | Low to moderate - mostly replacement parts |
| Wear and Tear Considerations | None - brand new installation | Assess socket and rod condition before replacement |
Closet Rod Socket Installation: Step-by-Step Guide
Closet rod socket installation involves securely attaching the socket brackets to the closet walls using screws and a level to ensure proper alignment and support. Precise measurements and the use of a stud finder optimize placement for maximum stability when holding the closet rod. Proper installation guarantees durability and prevents the rod from sagging or falling under weight.
Closet Rod Socket Replacement: Essential Steps
Closet rod socket replacement involves carefully removing the old socket by unscrewing or gently prying it from the wall or closet side panel. After ensuring the mounting area is clean and damage-free, the new closet rod socket is aligned and secured with appropriate screws or fasteners for stability. Proper replacement ensures the rod can support weight without sagging, maintaining closet organization and durability.
Tools Needed for Installation vs Replacement
Installing a closet rod socket typically requires basic tools such as a drill, screwdriver, measuring tape, level, and wall anchors for secure mounting. Replacement of a closet rod socket may also involve these tools but often demands additional items like pliers or a pry bar to remove the old socket and potentially extras like wood filler or touch-up paint to repair any damage. Understanding the specific tools needed for installation versus replacement ensures a smooth process and a sturdy, functional closet rod system.
Assessing Your Closet for New Socket Installation
Assessing your closet for new rod socket installation requires inspecting the existing rod support for damage, measuring the closet rod diameter, and ensuring wall studs or solid framing are accessible for secure mounting. Installing new closet rod sockets involves positioning the sockets at appropriate heights and distances to support the rod evenly and prevent sagging. Proper assessment avoids frequent replacements by ensuring the new sockets are compatible with the rod size and closet dimensions.
When Is Replacement of Closet Rod Sockets Necessary?
Closet rod socket replacement becomes necessary when the existing sockets show signs of wear, such as cracks, looseness, or damage that compromises the stability of the closet rod. Proper installation initially ensures secure support, but over time, stress and repeated use can weaken the sockets, requiring replacement for safe and efficient closet rod function. Identifying these issues early prevents rod sagging or falling, maintaining the closet's structural integrity and usability.
Common Challenges in Socket Installation and Replacement
Closet rod socket installation often faces challenges such as ensuring precise alignment with wall studs and securing the socket firmly to support weight, while replacement issues include removing damaged sockets without damaging the drywall. Both processes require accurate measurements and the use of proper anchors or screws to maintain stability. Failure to address these challenges can result in loose fittings and potential rod sagging or collapse.
Material Choices: New Installation vs Replacement Sockets
Closet rod socket installation allows for selecting materials such as durable metal or heavy-duty plastic to ensure long-lasting support tailored to the closet's design and load requirements. Replacement closet rod sockets often require matching the original socket material--commonly steel or molded plastic--to maintain compatibility and structural integrity while addressing wear or damage. Choosing the right material during installation can enhance durability and aesthetic, whereas replacement focuses on restoring function with material consistency.
Cost Comparison: Installing vs Replacing Closet Rod Sockets
Installing closet rod sockets typically incurs lower labor costs and requires fewer materials compared to replacing existing ones, which may involve removing old hardware and repairing damaged surfaces. Replacement costs can increase due to the need for additional tools, potential wall repairs, and higher labor time if the original sockets are deteriorated or improperly installed. Budgeting for closet rod socket replacement should account for both material expenses and potential unforeseen repairs, often making installation the more cost-effective option.
Safety Tips for Rod Socket Installation and Replacement
Ensuring secure closet rod socket installation begins with selecting the appropriate mounting hardware compatible with wall materials to prevent rod failure and potential injuries. During replacement, inspect the existing rod sockets for signs of wear or damage, and use anchors or wall plugs rated for the load capacity to maintain stability. Always wear protective eyewear and gloves to guard against debris and hand injuries, and confirm that the rod socket is mounted level to evenly distribute weight and enhance safety.
Maintenance After Installation and Replacement
Closet rod socket maintenance after installation involves regularly checking the socket for secure fittings and ensuring the rod remains properly aligned to prevent sagging or damage. Following replacement, it is crucial to inspect for any signs of wear or structural weakness that might have caused the initial failure, and to verify that the new socket is firmly anchored to support weight effectively. Routine cleaning and avoiding overloading extend the lifespan of both newly installed and replaced closet rod sockets.
Closet rod socket installation vs Closet rod socket replacement Infographic