Baluster installation involves adding new balusters to enhance safety and aesthetic appeal in staircases or balconies, typically during initial construction or remodeling. Baluster replacement focuses on removing old or damaged balusters and installing new ones to maintain structural integrity and update the design. Both processes require precise measurements and secure fastening to ensure durability and compliance with building codes.
Table of Comparison
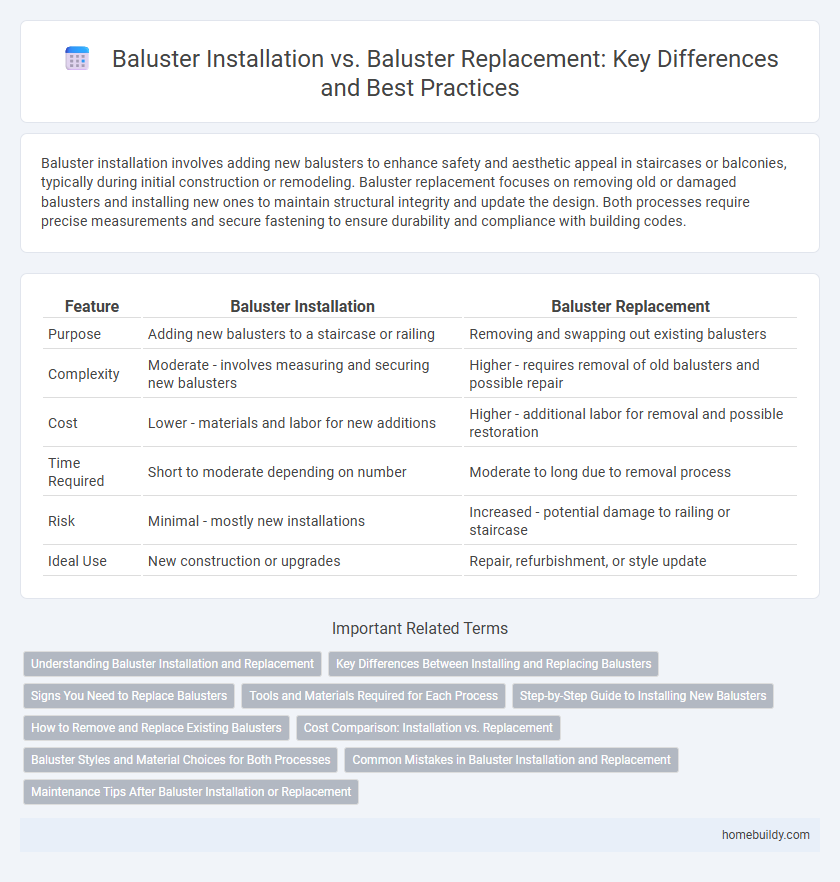
| Feature | Baluster Installation | Baluster Replacement |
|---|---|---|
| Purpose | Adding new balusters to a staircase or railing | Removing and swapping out existing balusters |
| Complexity | Moderate - involves measuring and securing new balusters | Higher - requires removal of old balusters and possible repair |
| Cost | Lower - materials and labor for new additions | Higher - additional labor for removal and possible restoration |
| Time Required | Short to moderate depending on number | Moderate to long due to removal process |
| Risk | Minimal - mostly new installations | Increased - potential damage to railing or staircase |
| Ideal Use | New construction or upgrades | Repair, refurbishment, or style update |
Understanding Baluster Installation and Replacement
Baluster installation involves securely fitting new balusters into a railing system to ensure stability and aesthetic appeal, often requiring precise measurements and compatible materials. Baluster replacement focuses on removing old or damaged balusters and installing new ones, which may involve addressing rot, wear, or design updates while preserving the structural integrity of the railing. Understanding these processes ensures safety, compliance with building codes, and enhances the overall look of staircases or balconies.
Key Differences Between Installing and Replacing Balusters
Baluster installation involves fitting new balusters in an area without previous ones, requiring precise measurements and alignment for structural support and aesthetic appeal. Baluster replacement focuses on removing old or damaged balusters and installing new ones in the existing framework, often necessitating adjustments to match the current design and safety standards. Key differences include the scope of preparation, potential modifications to handrails or base rails, and the complexity of matching materials and finishes during replacement.
Signs You Need to Replace Balusters
Baluster replacement becomes necessary when visible signs of wear such as cracked, rotting, or loose balusters compromise safety and structural integrity. Installation of new balusters is ideal during initial construction or complete railing upgrades, while replacement specifically addresses deterioration or damage over time. Ignoring signs like wobbling or water damage can lead to hazardous conditions requiring immediate baluster replacement.
Tools and Materials Required for Each Process
Baluster installation requires measuring tools, a power drill, screws, adhesives, and new balusters made from wood, metal, or composite materials, often accompanied by a level and a saw for precise cutting. Replacement involves similar tools but demands additional materials like wood filler, sandpaper, paint or stain to repair and finish the altered railing, along with pry bars or crowbars for removing old balusters safely. Both processes necessitate safety gear such as gloves and goggles to protect during cutting, drilling, and handling heavy or sharp components.
Step-by-Step Guide to Installing New Balusters
Installing new balusters requires careful measurement and alignment to ensure safety and aesthetic appeal; start by removing old balusters, if present, and cleaning the surface for smooth installation. Cut new balusters to the precise height, secure them with appropriate fasteners like screws or adhesive, and maintain consistent spacing according to building codes. Finish by sanding rough edges and applying paint or stain to protect and enhance the appearance of the baluster installation.
How to Remove and Replace Existing Balusters
Removing and replacing existing balusters involves first detaching the balusters from the handrail and base shoe by carefully prying or unscrewing to avoid damaging adjacent components. After removal, new balusters are measured, cut to size, and secured using appropriate fasteners or adhesives to ensure stability and alignment. Proper tools such as a pry bar, hammer, drill, and level enhance precision during the baluster installation process.
Cost Comparison: Installation vs. Replacement
Baluster installation typically costs between $20 and $50 per baluster, depending on materials and labor, while replacement expenses often range from $30 to $70 per baluster due to the need for removal and potential repair of existing structures. New installations may require additional groundwork or structural support, influencing overall project costs, whereas replacements can incur hidden expenses like damage restoration or matching existing designs. Evaluating the scope, material choices, and labor demands helps determine whether installation or replacement offers better value in specific baluster projects.
Baluster Styles and Material Choices for Both Processes
Baluster installation offers a wide range of styles such as traditional turned wood, sleek metal spindles, and modern glass panels, allowing homeowners to customize the aesthetic and functionality of their railing system. Material choices for installation include durable hardwoods like oak or maple, powder-coated steel for longevity, and tempered glass for a contemporary look, which can enhance both safety and design. When considering baluster replacement, matching existing styles and materials ensures seamless integration, but upgrading to more resilient materials like aluminum or composite can improve maintenance and durability while refreshing the overall appearance.
Common Mistakes in Baluster Installation and Replacement
Common mistakes in baluster installation include improper spacing, inadequate fastening, and failure to use level measurements, leading to unstable and uneven balusters. During baluster replacement, neglecting to remove old adhesive or damaging the railing structure often results in poor fit and compromised safety. Ensuring precise measurements, secure attachment, and careful preparation prevents costly errors in both installation and replacement processes.
Maintenance Tips After Baluster Installation or Replacement
Proper maintenance after baluster installation or replacement ensures durability and aesthetic appeal by regularly cleaning balusters with mild soap and water to prevent dirt buildup. Inspect baluster connections and fasteners periodically to identify loose components, tightening or repairing them promptly to maintain structural safety. Applying a protective sealant or paint every few years safeguards wooden or metal balusters from weathering and corrosion, extending their lifespan.
baluster installation vs baluster replacement Infographic